Billing
Billing is where you manage your TilliT AI subscription — view your current plan, track usage, purchase Manual Review Credits, upgrade or downgrade your plan, and view billing history.
Navigate to Billing in the left sidebar of the TilliT AI app.
Page Layout
The Billing page is divided into four main sections, stacked top to bottom:
- Current Plan — shows which plan you are on and lets you cancel
- Plan Usage — shows how much of your plan limits you have used this month
- Manual Review Credits — lets you purchase credits for human review sessions
- Select Your Plan — lets you switch to a different plan
- Billing History — a log of all past charges and subscription events
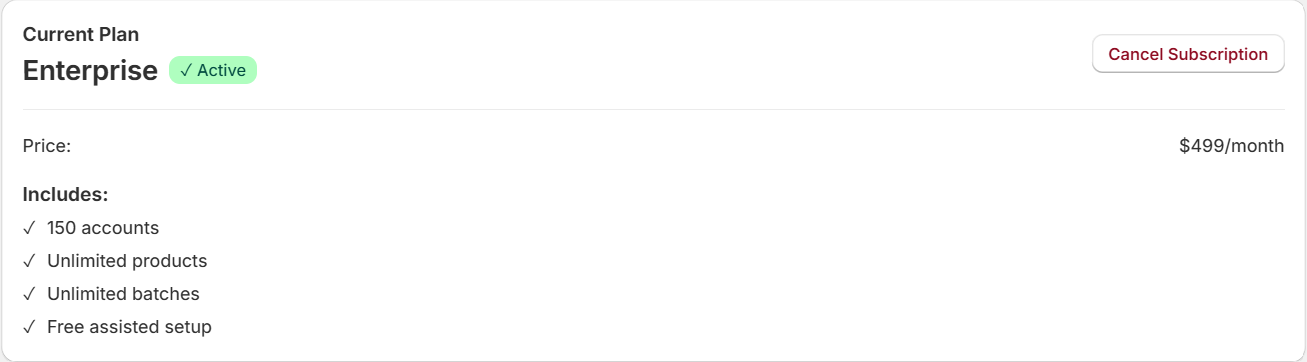
Current Plan
This card appears at the very top of the Billing page. It tells you which plan is active on your account right now.
Components of the Current Plan card
Plan name and status badge
The plan name (for example, Enterprise) is displayed in large bold text. Immediately to its right is a small green pill badge that reads ✓ Active. This badge confirms your subscription is running and in good standing.
Cancel Subscription button
In the top-right corner of the card is a button labelled Cancel Subscription. It has a red/coral text colour with a matching border, and a white background. This button does not cancel immediately — clicking it opens a confirmation dialog where you must type a phrase to confirm. See Cancelling Your Subscription below.
Price
Below the plan name, a line reads Price: with the monthly charge shown on the right (for example, $499/month). This is the amount that will appear on your Shopify invoice each billing cycle.
Includes checklist
A bold label Includes: is followed by a list of what your plan covers. Each item has a green ✓ tick on the left:
| Item | What it means |
|---|---|
| 150 accounts | Number of team member accounts you can create (varies by plan) |
| Unlimited products | No cap on how many products TilliT tracks |
| Unlimited batches | No cap on batch runs per month |
| Free assisted setup | TilliT team will help you set up your account at no extra cost |
Plan Usage
This card sits directly below the Current Plan card. It shows your real-time usage against your plan limits for the current billing period.

Components of the Plan Usage card
Plan badge (top right)
A green pill badge in the top-right corner of the card displays your current plan name (for example, Enterprise). This matches the plan shown in the Current Plan card above.
Products tracked
A row labelled Products tracked shows how many products TilliT is actively monitoring, displayed as [used] / [limit] on the right side of the row. For example: 11 / Unlimited means 11 products are tracked with no upper cap.
Batches this month
A row labelled Batches this month shows how many batch runs have been performed so far in the current billing month, also displayed as [used] / [limit]. For example: 30 / Unlimited means 30 batches have run with no cap.
Usage counters reset at the start of each new billing period. If your plan has a fixed limit (not Unlimited), you will see a number instead — for example 3 / 20 for the Starter plan.
Manual Review Credits
This card is below the Plan Usage card. Manual Review Credits are separate from your subscription — they are purchased on demand and never expire.

The card header shows the section heading Manual Review Credits on the left, a teal/light-blue pill badge labelled In-App Purchase to its right, and a large 0 with the label credits remaining in a light grey box on the far right. Directly below the heading is a subtitle line in smaller grey text:
Each pack gives your shop 10 human review or counselling sessions. Credits accumulate and never expire.
What are Manual Review Credits?
Each credit gives you one human review or counselling session performed directly by the TilliT team. This is used when you want an expert to manually review a certification, supply chain record, or batch result rather than relying solely on AI verification.
Credits are separate from your subscription plan. You can buy more at any time.
Key rules:
- Credits accumulate across purchases — they never reset
- Credits never expire
- Each credit = one manual review or one counselling session by the TilliT team
- Charges appear on your Shopify invoice (not a separate payment)
Credit count display
On the far right of the card header is a light grey box containing a large bold number showing your current credit balance, with the label credits remaining below it. When you have zero credits, the number displays as 0.
In-App Purchase badge
Next to the section heading is a teal/light-blue pill badge labelled In-App Purchase. This indicates that buying credits is handled as an in-app charge through Shopify — the cost appears on your regular Shopify invoice, not as a separate transaction.
Low credits warning
When your credit balance reaches 0, a pink/red alert banner appears below the card header:

You have no Manual Review Credits remaining. Purchase a new pack below to continue.
The banner has a soft pink background with a red diamond ⊗ icon on the left. It disappears once you have credits remaining.
Purchasing credits
Below the warning (or always visible if credits are low), the purchase section appears:
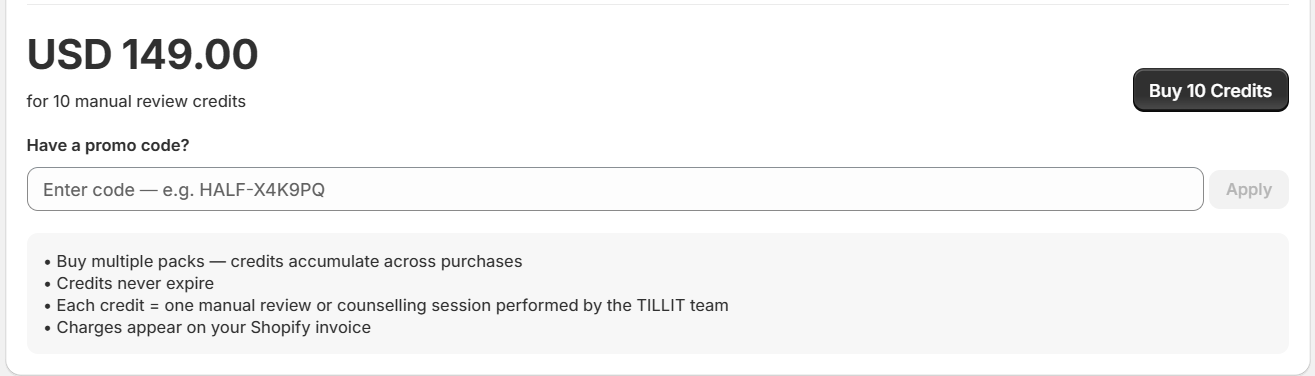
Price display
The price is shown in large text: USD 149.00, with a smaller line below reading for 10 manual review credits.
Buy 10 Credits button
A dark (near-black) button labelled Buy 10 Credits sits to the right of the price. Clicking this triggers a Shopify charge for USD 149.00, which will appear on your next Shopify invoice. You can click it multiple times — credits stack.
Promo code field
Below the price is a labelled input field: Have a promo code? The field shows placeholder text Enter code — e.g. HALF-X4K9PQ. Type your code and click the Apply button to the right. The Apply button is greyed out until you type something in the field.
After clicking Buy 10 Credits
When you click the Buy 10 Credits button, a confirmation section loads at the bottom of the card:
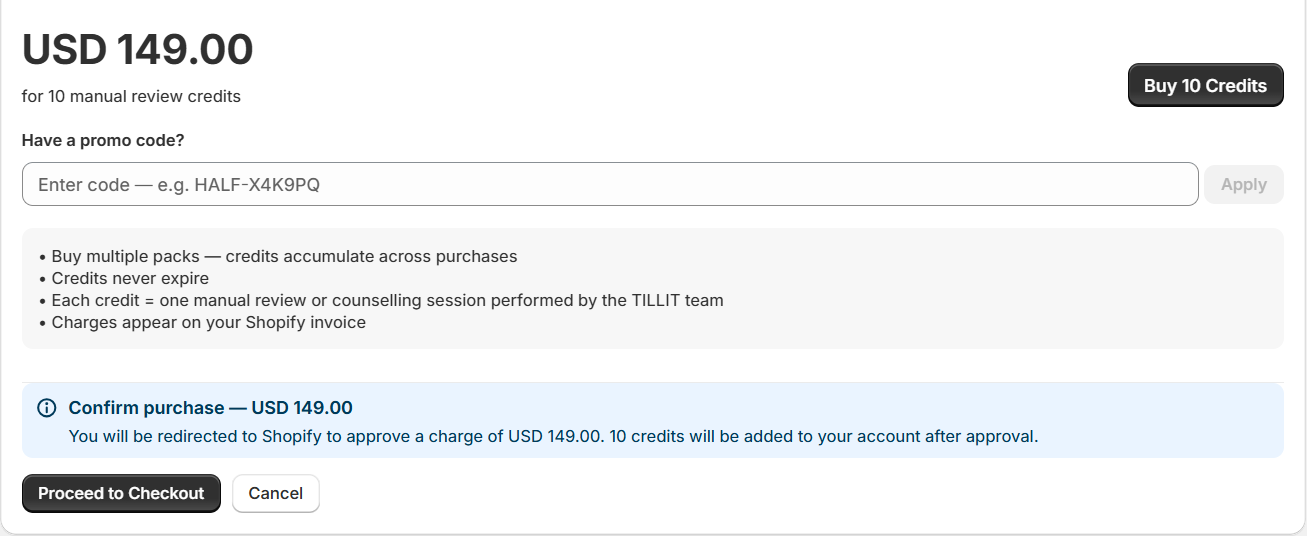
A light blue box appears with a ⓘ info icon on the left and the heading Confirm purchase — USD 149.00 in bold blue text. Below the heading is a line of grey text:
You will be redirected to Shopify to approve a charge of USD 149.00. 10 credits will be added to your account after approval.
Below the blue box are two buttons side by side:
- Proceed to Checkout — dark/black filled button. Clicking this redirects you to Shopify to approve the charge. Once approved, 10 credits are added to your account and you are returned to TilliT AI.
- Cancel — white button with a light border. Clicking this closes the confirmation box and returns the card to its previous state. No charge is made.
Select Your Plan
This section appears below the Manual Review Credits card. It lets you view all available plans and switch to a different one.
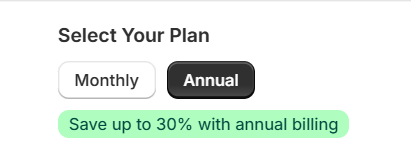
Billing cycle toggle
At the top of the section is a toggle with two options: Monthly and Annual. The currently selected option has a darker background (appears filled/highlighted). The unselected option has a lighter background.
When Monthly is selected:
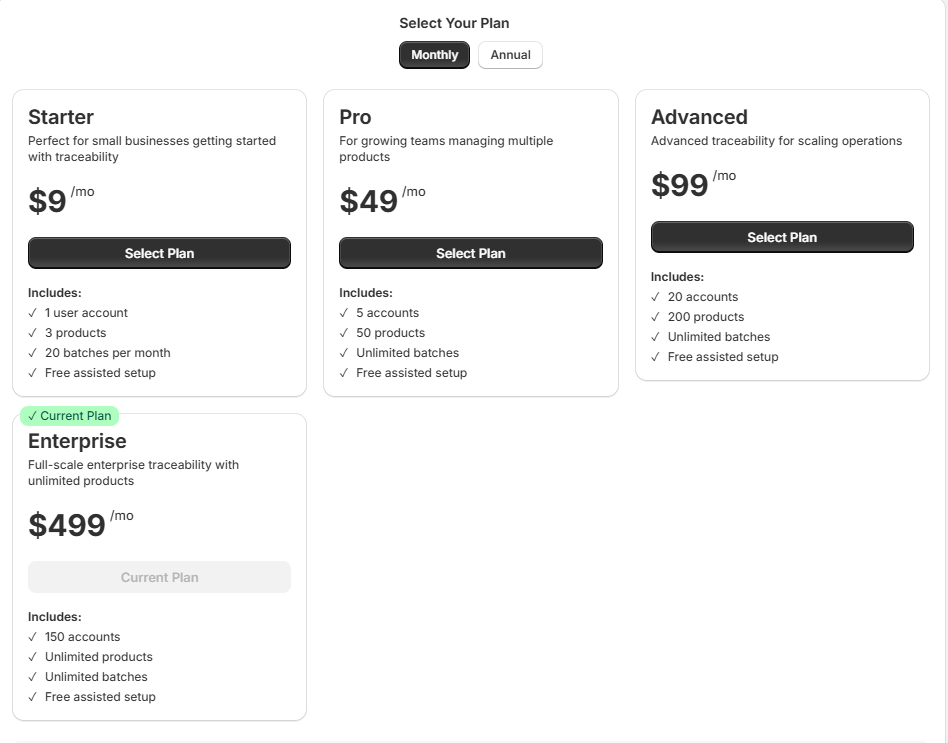
Each plan card shows its monthly price charged every month. There are no savings bars and no green savings banner — just the plan name, description, monthly price, and the Select Plan button. Monthly prices:
| Plan | Monthly price |
|---|---|
| Starter | $9/month |
| Pro | $49/month |
| Advanced | $99/month |
| Enterprise | $499/month |
When Annual is selected:
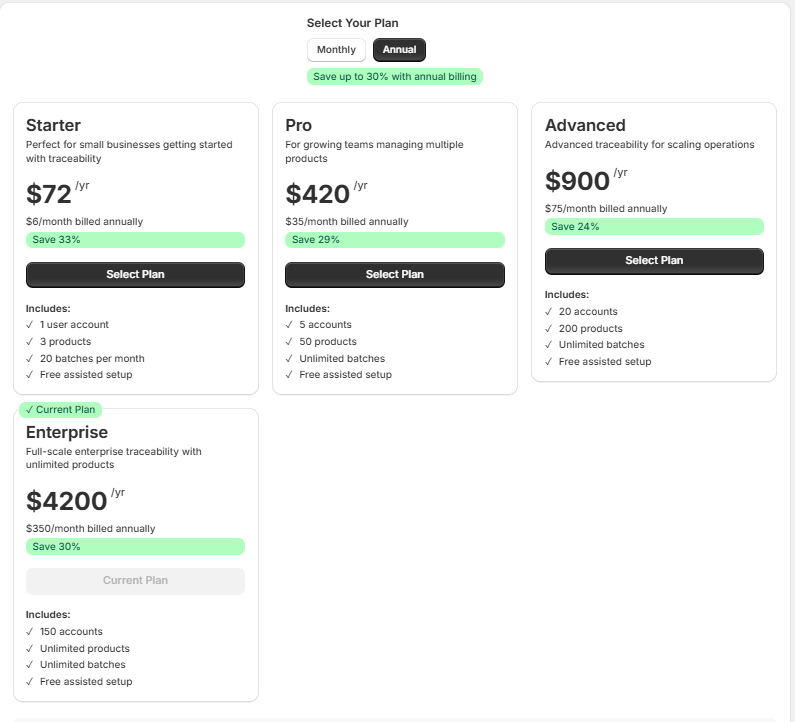
Each plan card shows the annual total price and the monthly equivalent. A green banner appears below the toggle reading Save up to 30% with annual billing. Each card also shows a green savings bar (for example, Save 33%) directly below the price. Annual billing charges the full year upfront at the discounted rate.
Plan cards
The plan cards are arranged in a grid below the toggle. Each card represents one available plan.
Starter
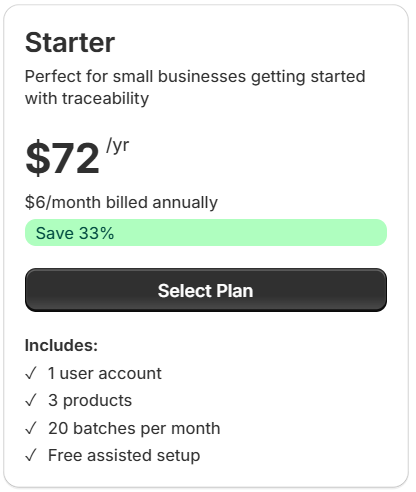
Description: Perfect for small businesses getting started with traceability.
| Detail | Value |
|---|---|
| Annual price | $72 / year |
| Monthly equivalent | $6/month billed annually |
| Monthly price | Available on Monthly toggle |
| Savings badge | Save 33% (green progress bar) |
Includes:
- ✓ 1 user account
- ✓ 3 products
- ✓ 20 batches per month
- ✓ Free assisted setup
Select Plan button — a dark full-width button. Clicking it starts the plan selection flow (see Choosing a Plan).
Pro

Description: For growing teams managing multiple products.
| Detail | Value |
|---|---|
| Annual price | $420 / year |
| Monthly equivalent | $35/month billed annually |
| Monthly price | Available on Monthly toggle |
| Savings badge | Save 29% (green progress bar) |
Includes:
- ✓ 5 accounts
- ✓ 50 products
- ✓ Unlimited batches
- ✓ Free assisted setup
Select Plan button — a dark full-width button.
Advanced
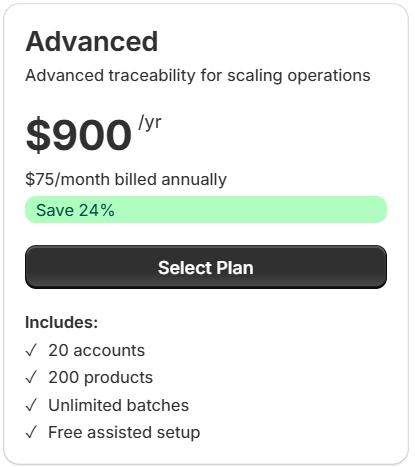
Description: Advanced traceability for scaling operations.
| Detail | Value |
|---|---|
| Annual price | $900 / year |
| Monthly equivalent | $75/month billed annually |
| Monthly price | $75/month |
| Savings badge | Save 24% (green progress bar) |
Includes:
- ✓ 20 accounts
- ✓ 200 products
- ✓ Unlimited batches
- ✓ Free assisted setup
Select Plan button — a dark full-width button.
Enterprise
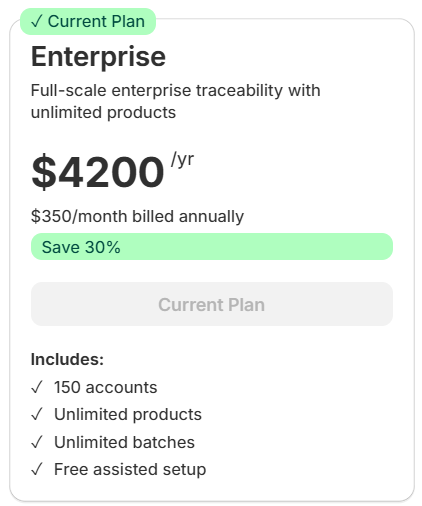
Description: Full-scale enterprise traceability with unlimited products.
| Detail | Value |
|---|---|
| Annual price | $4,200 / year |
| Monthly equivalent | $350/month billed annually |
| Monthly price | $499/month |
| Savings badge | Save 30% (green progress bar) |
Includes:
- ✓ 150 accounts
- ✓ Unlimited products
- ✓ Unlimited batches
- ✓ Free assisted setup
Current Plan badge — if Enterprise is your active plan, a green ✓ Current Plan badge appears in the top-left corner of the card.
Current Plan button — when this is already your active plan, the button is greyed out and reads Current Plan (not clickable). On other plans, this button would be the dark Select Plan button instead.
Billing Information bar
At the very bottom of the plan section is a light grey bar:

It has a blue ⓘ icon on the left followed by Billing Information in bold. The four reminders are displayed inline on a single line, separated by bullet dots (•):
New accounts get a 14-day free trial • Change your plan anytime • Cancel anytime, no questions asked • Charges appear on your Shopify invoice
Choosing a Plan
- In the Select Your Plan section, choose your billing cycle — Monthly or Annual using the toggle
- Review the plan cards and decide which plan fits your needs
- Click Select Plan on the plan card you want
- A confirmation window appears — review the charge and click Proceed to Checkout
- You are redirected to Shopify to approve the charge
- After approval, you return to TilliT AI and your new plan activates immediately
Switching from a lower plan to a higher plan (upgrading) takes effect immediately. Switching to a lower plan (downgrading) takes effect at the start of your next billing period.
Account Types
| Account Type | What it means |
|---|---|
| Standard | New merchant — not yet started a trial or subscription. Eligible for a 14-day free trial. |
| Trial active | Within your 14-day free trial with full access to all features at no cost. |
| Trial ended | 14-day trial has expired. You must select a paid plan to continue. |
| Beta customer | 60 days free access followed by 50% off for 10 months. |
| Beta app user | Using a custom-distribution version. Access managed directly by the TilliT team. |
| Subscribed | Active paid plan. Features and limits governed by your chosen plan. |
Starting Your Free Trial
New accounts are eligible for a 14-day free trial — no credit card required.
- Go to the Billing page
- Click Start 14-Day Free Trial
- The trial activates immediately — full access to all features begins right away
The free trial can only be used once per account. Once it ends, you must select a paid plan to continue using TilliT AI.
Trial Status Banner
While your trial is active, a banner appears at the top of the app showing how many days remain. The banner colour changes as the trial approaches its end:
| Days remaining | Banner colour | Recommended action |
|---|---|---|
| 8 or more days | Blue | No action needed |
| 4–7 days | Yellow | Consider choosing a plan soon |
| 1–3 days | Red | Select a plan immediately to avoid losing access |
| 0 days | Red | Trial ended — select a plan to continue |
Cancelling Your Subscription
You can cancel at any time — there are no cancellation fees. Your access continues until the end of the current billing period.
- Go to the Billing page
- Click the Cancel Subscription button in the top-right corner of the Current Plan card
- A popup dialog appears centred on screen — the rest of the page dims behind it:
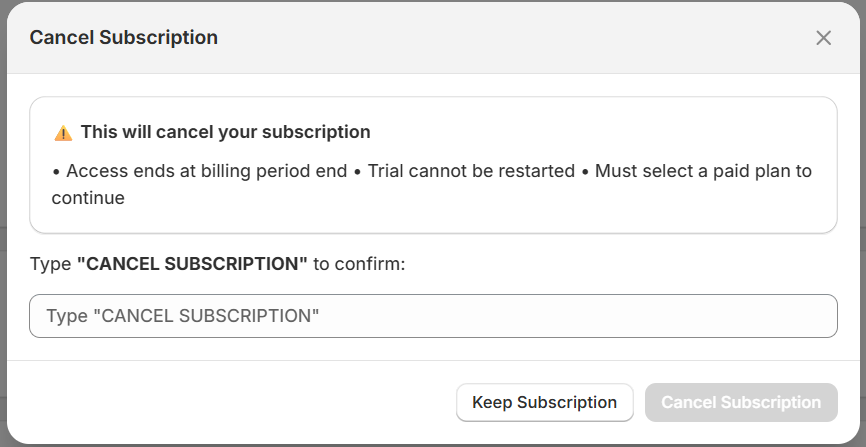
The popup contains:
Title bar — Cancel Subscription in bold on the left, with an ✕ close button on the top right. Clicking ✕ closes the popup without cancelling anything.
Warning box — a rounded outlined box with an ⚠️ icon and the heading This will cancel your subscription in bold. Below it, three consequences are listed inline:
Access ends at billing period end • Trial cannot be restarted • Must select a paid plan to continue
Confirmation field — a label reads Type "CANCEL SUBSCRIPTION" to confirm: and below it is a text input field with the placeholder Type "CANCEL SUBSCRIPTION". You must type this phrase exactly — including the capital letters and the quotation marks — before the cancel button becomes active.
Buttons (bottom row):
- Keep Subscription — white button with a border. Clicking this closes the popup and keeps your subscription active. Nothing is cancelled.
- Cancel Subscription — greyed out until you type the confirmation phrase correctly. Once the phrase matches, it becomes clickable and confirms the cancellation.
- Type
"CANCEL SUBSCRIPTION"(with quotation marks, all capitals) in the confirmation field - Click the now-active Cancel Subscription button
- Your subscription is scheduled to cancel at the end of the current billing period
Access does not end immediately. You keep full access until your current billing period finishes.
Billing History
The Billing History section is at the bottom of the Billing page. It shows the last 10 billing events on your account.
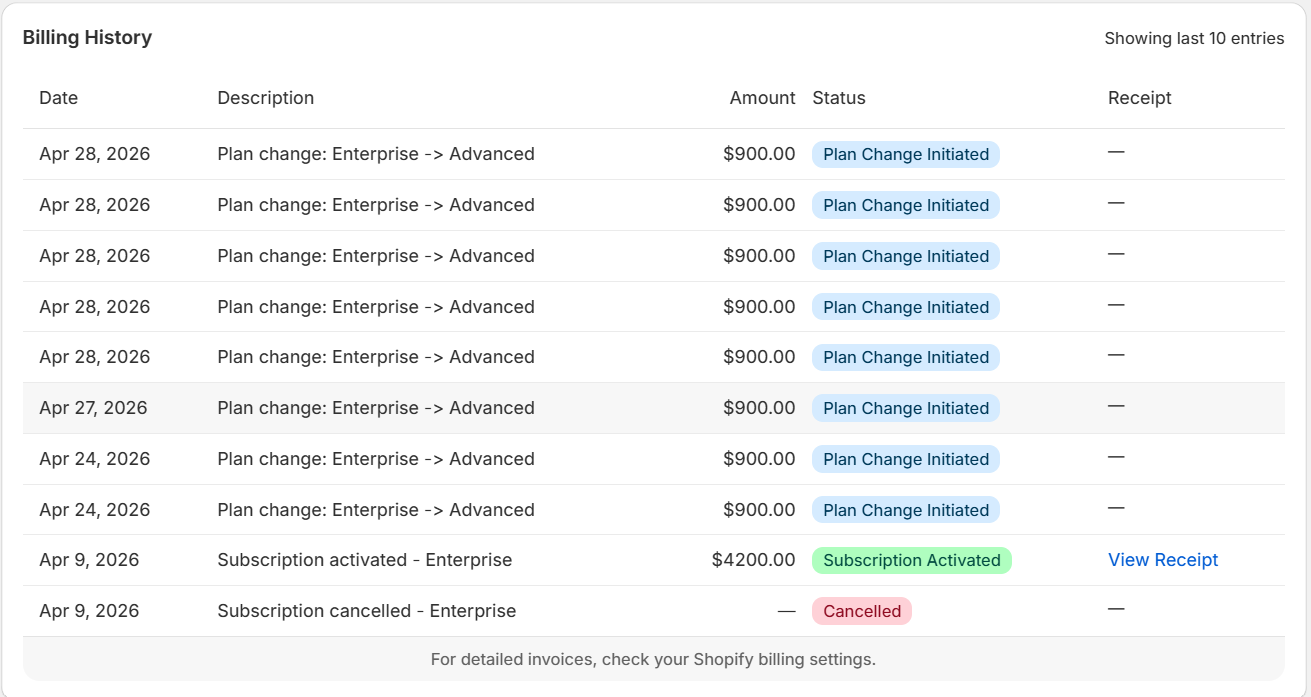
Table columns
| Column | What it shows |
|---|---|
| Date | The date the event occurred (format: Month DD, YYYY) |
| Description | What happened — e.g. "Subscription activated - Enterprise" or "Plan change: Enterprise → Advanced" |
| Amount | The charge amount in USD. A dash (—) means no charge was made for that event |
| Status | A coloured badge showing the outcome of the event |
| Receipt | A link to download the receipt, if one is available |
Status badges
Each billing event has a status badge that uses colour to show the outcome at a glance:
| Badge | Colour | What it means |
|---|---|---|
| Plan Change Initiated | Blue | A plan change has been requested and is being processed by Shopify |
| Subscription Activated | Green | A new subscription or reactivation was successfully charged |
| Cancelled | Pink/Red | A subscription was cancelled |
View Receipt link
When a receipt is available, a View Receipt link appears in the Receipt column. Clicking it opens the receipt in a new tab or downloads it as a PDF depending on your browser settings. Receipts are only available for completed charge events — pending or cancelled events show a dash (—) instead.
Footer note
Below the table, a small grey line reads:
For detailed invoices, check your Shopify billing settings.
This means itemised invoices with full billing details are in your Shopify Admin → Settings → Billing, not inside TilliT AI.
Quick Reference
| Topic | Detail |
|---|---|
| Free trial length | 14 days (standard) or 60 days (beta customers) |
| Trial restriction | Can only be used once per account |
| Starter plan | $72/yr ($6/month) — 1 user, 3 products, 20 batches/month |
| Pro plan | $420/yr ($35/month) — 5 accounts, 50 products, unlimited batches |
| Advanced plan | $900/yr ($75/month) — 20 accounts, 200 products, unlimited batches |
| Enterprise plan | $4,200/yr ($350/month) or $499/month — 150 accounts, unlimited everything |
| Annual billing saving | Up to 30% vs monthly |
| Beta discount | 50% off for 10 months after free period |
| Manual Review Credits | $149 for 10 credits — never expire, stack across purchases |
| Cancellation policy | Cancel anytime — access ends at billing period end |
| Where charges appear | On your Shopify invoice (Shopify Admin → Settings → Billing) |
| Receipts | Click "View Receipt" in Billing History table |
Was this page helpful?